ObjectListView and Drag & DropDropping the drag from Drag & Drop |
ObjectListView and Drag & Drop
As of v2.2, ObjectListView has sophisticated support for dragging and dropping. This support makes it easy to support interapplication drag and drop, dragging within your application, and making lists that can be rearranged by dragging.
The easy way
The simpliest way to use drag and drop in an ObjectListView is through the IsSimpleDragSource and IsSimpleDropSink properties (which can be set through the IDE).
Setting these gives an ObjectListView that will allow objects to be dragged and dropped on items, like this:
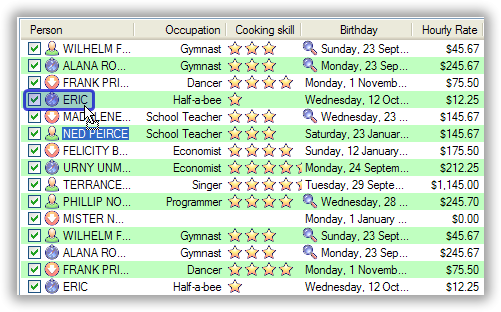
If you set IsSimpleDragSource to true, the ObjectListView will be able to initiate drags. It will drag the currently selected items, as well as creating text and HTML versions of those rows that can be dropped onto other programs.
If you set IsSimpleDropSink to true, the ObjectListView will be able to receive drops. The normal drop sink does a lot of work for you: figuring out which item is under the mouse, handling auto scrolling, drawing user feedback. However, there are two things that it can’t figure out for itself:
- Are the dragged objects allowed to be dropped at the current point?
- What should happen when the drop occurs?
So, the normal drop sink triggers two events: CanDrop and Dropped. To actually be useful, you need to handle these events. You can set up handlers for these events within the IDE, like normal.
You can alternatively listen for the ModelCanDrop and ModelDropped events. This second pair of events are triggered when the source of the drag is another ObjectListView. These events work the same as the CanDrop and Dropped events except that the argument block includes useful information:
- The ObjectListView initiated the drag
- The model objects are being dragged
- The model object is current target of the drop
Handling the events - CanDrop
In the CanDrop (or ModelCanDrop) event, the handler has to decide if the currently dragged items can be dropped at the current location. To indicate what operation is allowed, the handler must set the Effect property:
private void listViewSimple_ModelCanDrop(object sender, ModelDropEventArgs e) {
    Person person = e.TargetModel as Person;
    if (person == null) {
        e.Effect = DragDropEffects.None;
    } else {
        if (person.MaritalStatus == MaritalStatus.Married) {
            e.Effect = DragDropEffects.None;
            e.InfoMessage = "Can't drop on someone who is already married";
        } else {
            e.Effect = DragDropEffects.Move;
        }
    }
}
Inside the CanDrop handler, you can set the InfoMessage property to a string. If you do this, the string will be shown to the user while they are dragging. This can be used to tell the user why something cannot be dropped at that particular point, or to explain what will happen if the drop occured there:
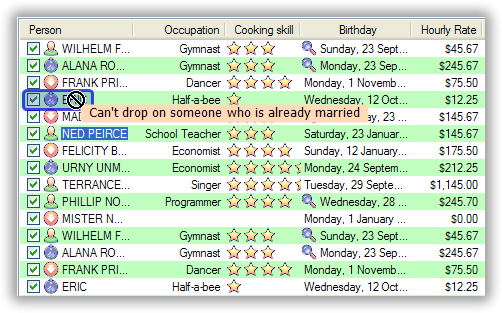
This message is displayed by a specialised TextOverlay, which is exposed through the Billboard property of the SimpleDropSink class. You can make changes to the messages appearance through this property.
Handling the events - Dropped
If the allowed effect was anything other than None, then when the items are dropped, a Dropped (or a ModelDropped) event will be triggered. This is where the actual work of processing the dropped item should occur. A silly example from the demo looks like this:
private void listViewSimple_ModelDropped(object sender, ModelDropEventArgs e) {
    // If they didn't drop on anything, then don't do anything
    if (e.TargetModel == null)
        return;

    // Change the dropped people plus the target person to be married
    ((Person)e.TargetModel).MaritalStatus = MaritalStatus.Married;
    foreach (Person p in e.SourceModels)
        p.MaritalStatus = MaritalStatus.Married;

    // Force them to refresh
    e.RefreshObjects();
}
The ModelDropped event has a convenience method, RefreshObjects(), which refreshes all the objects involved in the operation. This is particularly useful with operations on TreeListViews.
Simply doing more
If you want to do more than this, you have to start playing with the objects that actually implement the drag and drop: SimpleDataSource and SimpleDropSink (though calling the latter “simple” is a bit of a misnomer).
SimpleDataSource
The major task of the SimpleDataSource is to setup a DataObject which can be used for dragging and dropping. If you want your ObjectListView to support other data formats, you will need subclass SimpleDataSource and add the data formats you want.
SimpleDropSink
SimpleDropSink is a lot more interesting and a lot more configurable.
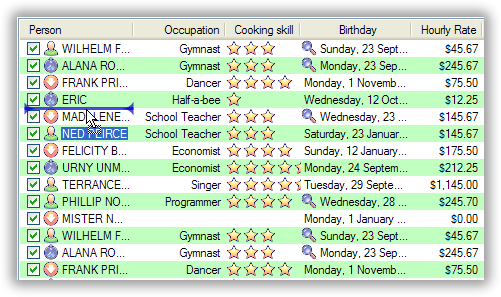
It can be made to accept drops between items: myDropSink.CanDropBetween = true;
|
|
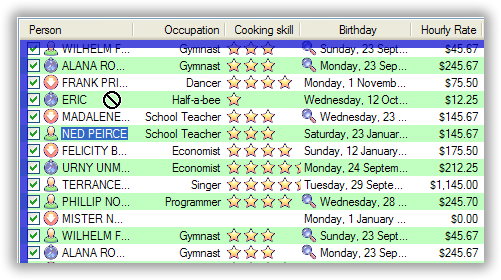
Or drops on the background: myDropSink.CanDropbackground = true;
|
|
Or drops on individual sub-items: myDropSink.CanDropOnSubItems = true;
|
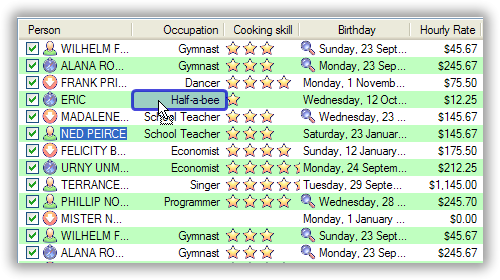
|
It can also change the color used for the drag drop feedback: myDropSink.FeedbackColor = Color.IndianRed;
|
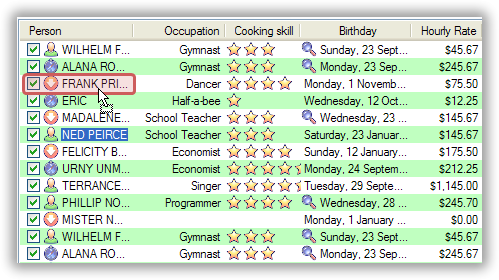
|
Doing a lot more - Drag and Drop the hard way
It’s not really that hard – just more work than the easy way.
If you want to have complete control of the dragging process, you can implement the IDragSource interface, and then give that implementation to the ObjectListView by setting the DragSource property.
Similarly, if you want to have complete control of the dropping process, you can implement the IDropSink interface, and then give that implementation to the ObjectListView by setting the DropSink property.
For maximum flexibility, the IDropSink basically just unifies the full suite of Windows drag-drop messages:
public interface IDropSink
{
    ObjectListView ListView { get; set; }

    void DrawFeedback(Graphics g, Rectangle bounds);
    void Drop(DragEventArgs args);
    void Enter(DragEventArgs args);
    void GiveFeedback(GiveFeedbackEventArgs args);
    void Leave();
    void Over(DragEventArgs args);
    void QueryContinue(QueryContinueDragEventArgs args);
}
The only new method in this list is the DrawFeedback() method. This is where the DropSink can draw feedback onto the ObjectListView to indicate the state of the drop. This drawing is done over the top of the ObjectListView and this will normally involve some form of alpha blending.
In almost all cases, you can subclass AbstractDropSink which provides minimal implementations of all these methods.
Rearranging rows by dragging
One common use for drag and drop is to provide a rearrangeable ObjectListView. This is so common that there is a prebuild component to do this for you. This is done by installing a RearrangingDropSink:
this.objectListView1.DragSource = new SimpleDragSource();
this.objectListView1.DropSink = new RearrangingDropSink(false);
This turns objectListView1 into a rearrangeble list, where the user can rearrange the rows by dragging them. The false parameter says that this sink will not accept drags from other ObjectListViews.
The class is clever but it is not magical. It works even when the ObjectListView is sorted or grouped, but it is up to the programmer to decide what rearranging such lists “means”.
Example: if the control is grouping students by academic grade, and the user drags a “Fail” grade student into the “A+” group, it is the responsibility of the programmer to makes the appropriate changes to the model and redraw/rebuild the control so that the users action makes sense.
Similarly, it is up to the programmer to decide what should happen if the user rearranges rows when the list is sorted.
It also cannot work on DataListView, VirtualObjectListView and TreeListViews since the data in those control is outside the control of the ObjectListView. For those controls, you will have to use (or subclass) a SimpleDropSink and do the actual rearranging and refreshing yourself.
See this blog for a detailed discussion of how to make a rearrangeable TreeListView.